Machine vision offers an accurate and efficient method of inspecting package seals in medical and pharmaceutical manufacturing, providing companies a means to comply with device testing regulations and avoid costly recalls.
In this article, we cover real-life examples of different types of closure seals and the challenges associated with inspecting them, recall concerns and ramifications, and methods for effective automated inspection, such as deep learning.
Before going too far down the road, we should provide some background about why medical device manufacturers need to perform inspections, what type of defects we typically find, and where they manifest.
Deep learning and pattern recognition software can mitigate serious content verification and orientation risks.
Why Perform Defect Detection?
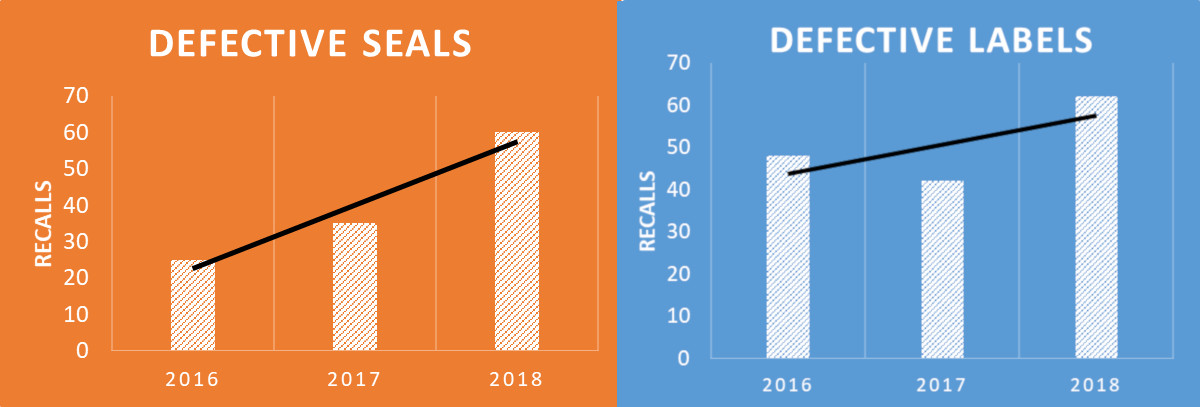
Defective packaging and labels are two of the top reasons for FDA recalls, and, as shown in Figure 1, the trend is increasing year over year. Over the past three years, package seal and label recalls affected 200 companies.
Digging deeper into the nature of the recalls, three primary categories stand out:
- Defective seals
- Label issues
- Content verification
Figure 1. Medical device recalls, year-over-year, 2016-2018
Packaging seals are critical when dealing with medical devices, as any sterility breach can harm patient health and expose manufacturers to additional risks. Manufacturers set the sterility breach threshold for foreign material defects at 50 microns. Humans, who typically perform visual inspection of package seals, can visually identify a defect of this size; however, with at least eight types of package seal defects, finding and identifying multiple defects roughly the size of a human hair at a rate of approximately five seconds is challenging for human inspectors.
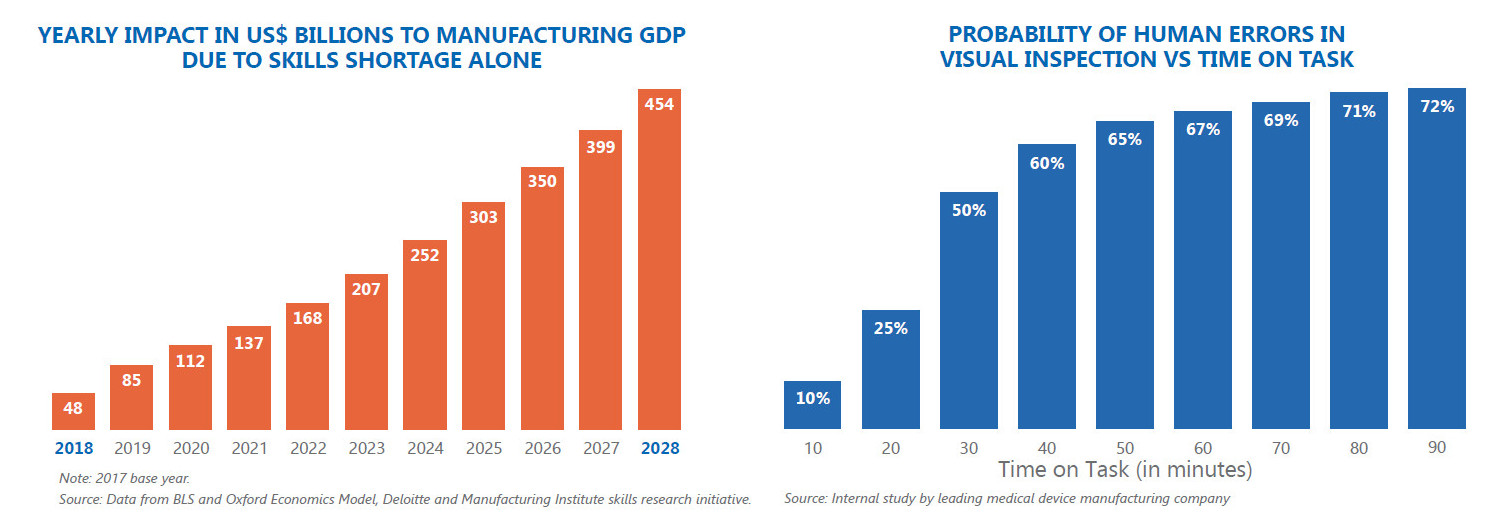
When you factor in other key risk factors—declining availability of skilled labor, long training cycles required to perform critical processes, and the Saccadic effect causing human visual inspection rates to fall over time—the risk of quality escapes or product failures grows exponentially.
Figure 2. Key risk factors to product failures
Labeling is another area rife with potential for defects and quality risks. In addition to ensuring the presence (or absence) of a printed label and the legibility of that label, label inspections must identify gross defects such as pin holes and punctures, scratches or cuts, as well as perform cross verification of barcode patterns and data matrixes, OCR product information, while providing adequate product traceability.
The third primary challenge for medical device manufacturers is content verification. Performing part orientation and verification prevents kitting process issues from adversely affecting product quality. This process includes inspecting packaged products for issues such as:
- Lighting & reflections
- Overlapping parts
- Complex 3D shapes
- Inconsistent/incorrect position
- Missing parts
- Reversed orientation
These three categories represent intense challenges in the manufacturing process, as a medical device that ships with any of these defects exposes your business to significant, and unnecessary risk. So how do medical device manufacturers navigate these challenging waters to deliver safe and effective products?
How to Perform Defect Detection
Now that we have highlighted the problems, we can dig into the three recommended solutions for performing defect detection with machine vision. As a best practice, DWFritz builds a universal hardware platform capable of imaging all required inspections for the following three techniques:
- Rule Based Software
- Example Based Software
- Machine Assisted Manual Inspection
Rule-based software is used primarily for metrology dimensional applications—finding dimensional deviations. This method relies on detecting contrast differences that are measured and compare to known nominal value. Using rule-based software to check on geometrical changes works well when provided with a good contrast image. This tool is fast and repeatable, as it is not attribute based and does not need many samples.
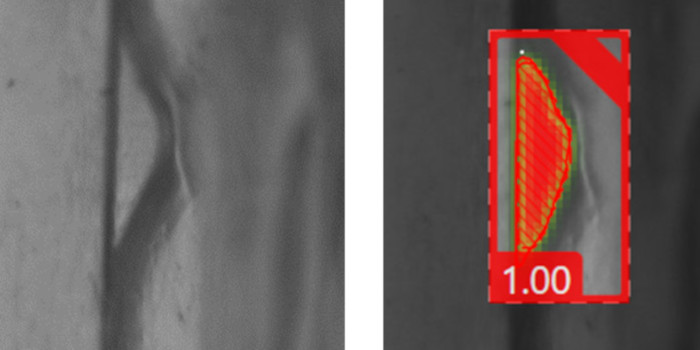
Example-based software is an artificial intelligence (AI) defect detection tool trained by sample images of good and bad parts to identify defects. The AI uses human-like judgement to detect cosmetic flaws and flags pixels within the image identified as an anomaly. Unlike traditional machine vision systems, AI defect detection tools can identify defects complicated by noisy backgrounds or an inability to obtain high-contrast.
Figure 3. By training the system to identify good versus defective parts, the system can search and classify these images. The red area on the right is the processed image where the software detected an anomaly.
Machine-assisted manual inspection takes a hybrid approach to inspections when the other techniques cannot confidently differentiate between good and bad parts. As multiple defects can be found on a single part, machine-assisted manual inspection reduces the overall dataset by removing good parts with low scores and bad parts with high scores that fail due to other defects, leaving only a subset of parts for manual review.
This method offers several advantages over visual inspections performed with a microscope or magnifying lens. The system gathers clear and repeatable part images, showing only pertinent defects, which improves inspection cycle times and yield. Operators benefit from reduced ergonomic strain and fatigue issues, and a checklist guides information collection improving operator performance while reducing traceability errors.
Combining Three into One
There is no one-size-fits-all approach for defect detection. Due to stringent acceptance criteria regulated by the FDA, even after performing rules- and example-based defect detection, machine-assisted manual inspection may still be required to achieve the desired results. When combined, though, these three techniques can provide a single, comprehensive inspection process.
Developing an overall system starts with defect training. Early customer collaboration in defect identification and results is critical at this step, as defining a defect from a good part avoids ambiguity and overlap. Involving customers early in the defect training process to correctly identify defects and avoid false-positives will result in preventing costly rework down the line. Collaborating on inspection results during the training cycle is equally important, particularly when you need client approval to adjust the inspection methodology and achieve their desired GR&R.
Once defects are defined, set time limits per defect so the system focuses on frequently occurring defects first. Once these times limits are established, generate on-tool inspection results for client review and prioritization.
Delivering Class 3 medical devices that meet a zero-defect quality standard is a major challenge. One quality escape along the way could expose your business to significant risks, but choosing the right precision automation partner capable of delivering innovative solutions using advanced technologies can make your journey to market much less challenging.


