In surface morphology inspection, non-contact optical methodologies provide the same measurement results as a conventional contact profiler, but in a fraction of time.
Surface finish quality matters in many industries, especially when consumer health and costly recalls are at stake. When inspecting medical implants like knee joints, medical device manufacturers need to validate both smooth surfaces for wear as well as rough surfaces for the growth and attachment of bone cells. Driven by safety, recall and reliability concerns, automotive and aerospace manufacturers inspect the surface quality and coatings on gears, cylinder bores and turbine blisks to achieve the correct surface texture.
By understanding the pros and cons of using tactile probes and non-contact optical methods for surface morphology inspection, manufacturers can choose the method best suited for their application.
In a comparison study of contact and non-contact surface profiling techniques conducted by DWFritz Automation engineers, the team found that while both tactile probes and non-contact optical techniques provide similar surface morphology results, non-contact methods significantly decrease the inspection cycle time.

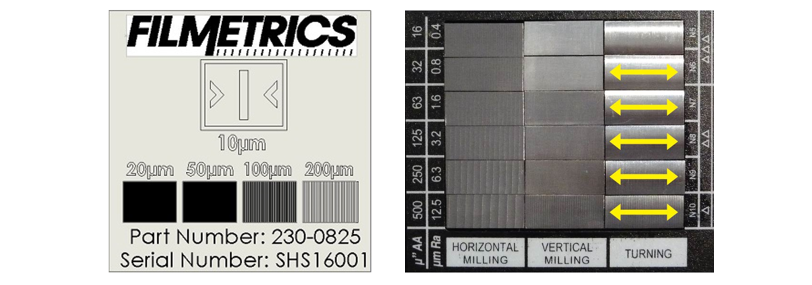
The study used a Filmetrics step height standard coupon (left) and a non-calibrated roughness coupon for turning (N6-N10).
By measuring standard roughness coupons, the team tested the measurement performance for contact profilometry versus four non-contact optical surface morphology characterization techniques, including chromatic confocal, laser triangulation, white light interferometry (WLI) and low coherence interferometry (LCI).
The study found that for inspection speed, non-contact methods outperform tactile probes. Non-contact methods using 2D line measurements can accelerate measurement times between 3X and 20,000X. In contrast, non-contact 3D measurements create a rich data set, but can be slow due to the high volume of data.
Tactile surface profiling inspection has risks, including part surface marring and deformation, the potential for cross contamination, and wear or damage of the contact probe tip. However, contact methods are more tolerant of surface specularity and translucence, the team found. In comparison, some non-contact optical techniques are challenged by steep specular slopes and transparent surfaces, but better tolerate surface reflectivity and achieve higher lateral resolution.
Method
- Contact
- Chromatic confocal
- Laser triangulation
- White light interferometer (WLI)
- Low coherence interferometry (LCI)
Pros
- Tolerant of surface specularity and translucence. Somewhat tolerant of surface contamination.
- Most optically tolerant of the optical sensors. Fast 2D measurements.
- Fast for 2D and 3D with larger field of view (FOV).
- Tolerant of surface reflectivity. Very high lateral resolution.
- Fast high resolution 2D measurements. Tolerant of surface reflectivity.
Cons
- Slow speed, surface damage and potential for cross contamination. Tip geometry limits or distorts surface morphology.
- May not measure steep specular surfaces.
- Low lateral resolution. Challenged by specularity, translucence and steep slopes.
- Generally small FOV. Requires stationary part. Slow for 3D.
- 2D only. Slightly lower lateral resolution than WLI.
The methods are equivalent in many cases where the surfaces are tolerant of all measurement types. The laser, confocal, LCI and WLI demonstrate equivalent performance for the spatial wavelengths studied, which are applicable for most machined surfaces. Differences may be observed at smaller wavelengths with fine ground or lapped surfaces.
If fast surface morphology characterization techniques are used and the profiling results are available within seconds, then manufacturers can integrate the non-contact technology nearline or inline to quickly identify trends for process optimization and quality improvements in real-time. This can significantly reduce rework or scrap, translating to yield and throughput gain.

