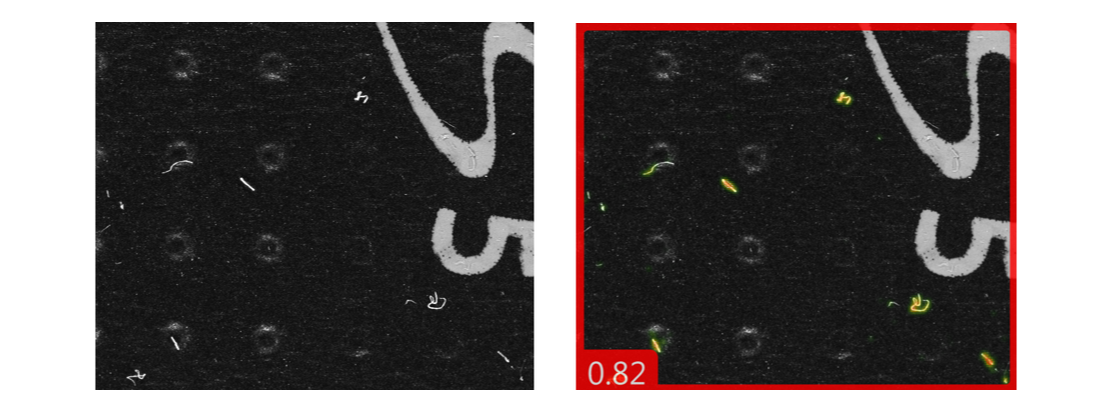
Using deep learning, smart machine vision systems can inspect complex surfaces and parts for cosmetic defects, increasing manufacturing productivity and throughput.
Automated cosmetic defect inspection can be challenging — past efforts with computer vision required brute force methods involving several months of coding and debugging. Today, however, there is a more efficient approach to machine vision problems using deep learning. These smart machines can now be taught to learn how to identify defects using example-based training modeled on human learning.
Deep learning technology uses neural networks, which mimic human intelligence to distinguish between cosmetic anomalies while tolerating natural variations in complex patterns, according to Cognex. Deep learning-based systems excel at inspecting complex surfaces and cosmetic defects, like scratches and dents on parts that are glossy, shiny or rough.
Smart inspection technology pays off in increased productivity, repeatability and throughput. According to McKinsey, productivity may potentially increase by as much as 50% when manufacturers use advanced image recognition techniques for visual inspection and detection. AI or artificial intelligence-based image recognition may increase defect detection rates by up to 90% compared to human inspection.
Defining Artificial Intelligence, Machine Learning and Deep Learning
What makes a smart machine intelligent depends on the type of artificial intelligence used — machine learning or deep learning. The terms are often used interchangeably, but the techniques are different.
At a high level, artificial intelligence is the general field focused on using software to make machines intelligent, with the goal of emulating a human being’s unique reasoning abilities. Machine learning uses algorithms to discover patterns and generate insights from the data. Machine learning uses several techniques such as deep learning, regression analysis, Bayesian networks, logic programming and clustering to implement artificial intelligence into a system.
Deep learning is a subfield of machine learning that mimics the neural networks in the human brain by creating an artificial neural network (ANN). Like the human brain solving a problem, the software takes inputs, processes them and generates an output. This method uses weights that are adjusted through a training program to teach the ANN how to properly respond to inputs. So more repetitive teaching makes the ANN stronger and therefore better at identification or prediction. It is like a child learning to recognize the alphabet or multiplication table.
Deploying Automated Defect Detection in the Factory
There is a growing need for inspecting micron-level defects in consumer electronics and medical devices. Unlike metrology where specific part locations are measured, defects appear in multiple locations and combinations. For example, a smartphone may have scratches, dents and chipping in multiple places, including the housing, curved sides and cover glass. Manufacturers need to process entire parts to capture these defects.

The deep learning system can detect defects on smartphone housing (right image).
Deep learning also has several uses in medical device manufacturing. It can find defects, such as scratches on femoral knee implants, and inspect the package seals on Class 3 devices. Deep learning vision also ensures all components are present in packages during assembly verification, such as parts in a surgical kit. In addition to defect detection, deep learning can often classify the type of defect, enabling closed-loop process control.
When training a deep learning system, it is important to create a data set of sample images to build and train the model, starting with 30 to 50 images per defect and the same amount per good part. New images can then be added to reflect false reject and accept cases. By defining a full range of part, material and defect types, manufacturers can emphasize variability in the training set. It is also recommended to have two human experts grade images independently for validation and to confirm consensus between their judgment. It typically takes one week per defect to train the model.
The concept of garbage in, garbage out is critical when choosing the best images to train the system. It is ideal to collect image data sets of both good and bad parts under the expected lighting and optics conditions. Capturing high contrast images of difficult surfaces — such as glass and specular textured colored materials — requires custom lighting techniques, advanced imaging and precise part manipulation.

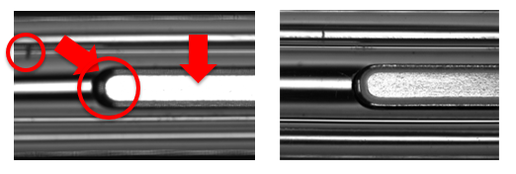
Defects in the low contrast image on the left are hard to detect compared to the high resolution image on the right.
Poor quality images make training difficult for both the software and human graders, causing issues with classification and repeatability. To minimize false negatives and positives, try using high contrast images with 5 to 10 pixels describing the smallest defect. For example, when inspecting scratches on a smartphone, the machine vision will zoom in to focus on the image at the 5 micron resolution level. Having a high quality image helps human graders to validate the image, and the software to identify the difference between a scratch defect and acceptable machining marks.
When the deep learning vision system is ready for mass production inspection, consider using a two-tiered inspection approach. In tier 1, use automated inspection with deep learning machine vision on all parts. Then in tier 2, do manual confirmation of all borderline defective part results. This provides confidence and redundancy, as well as supplying data for incremental training improvement of the deep learning system.
Whether it’s used to locate, read, inspect or classify features of interest, deep learning-based image analysis is a fast and flexible way to improve part quality.
Learn how our custom, high-speed inspection systems identify and classify micron-level defects and surface flaws.
